
How to Build a Ridge Rooflight Upstand
Installing a ridge rooflight can transform your home, flooding vaulted ceilings or open spaces with natural light. However, a well-constructed upstand (or kerb) is critical to ensure the rooflight sits securely, drains properly, and integrates seamlessly with your roof. At Overhead Glazing, we’ve seen firsthand how a properly built upstand prevents common issues like leaks or misalignment. This guide walks you through building a timber upstand for a ridge rooflight, with practical tips, common pitfalls to avoid, and expert advice for UK homeowners and installers.
What Is a Ridge Rooflight Upstand?
A ridge rooflight sits at the apex of a pitched roof, spanning both slopes to maximize daylight in spaces like lofts or extensions. The upstand is the timber structure that supports the rooflight, elevating it above the ridge tiles and providing a level surface for fixing.
It ensures proper integration with flashing and roofing materials, preventing water ingress and ensuring structural stability.Key Considerations Before Building
Key Considerations Before Building
Before you start, plan carefully to avoid costly mistakes:
- Roof Pitch and Ridge Angle: The roof’s pitch (e.g., 35°) determines the mitre cuts for the upstand. For a 35° pitch on both sides, the internal ridge angle is 110°, requiring 35° mitre cuts per side.
- Ridge Tile Clearance: The upstand must sit at least 60mm above the finished ridge tiles to avoid interference with the rooflight frame, ensuring a flush fit.
- Structural Load: Consult a structural engineer to confirm the rafters and ridge beam can support the rooflight’s weight, especially for large or bespoke units

Step-by-Step Guide to Building a Ridge Rooflight Upstand
Step 1: Set Out the Opening
- Use the rooflight manufacturer’s clear opening size and kerb specifications to mark the opening.
- Ensure the opening is centred over the ridge and square to the rafters for a balanced installation.
Step 2: Trim and Reinforce
- Cut back existing rafters and install trimmers to frame the opening.
- Double up rafters under load and reinforce the ridge beam if needed, especially for heavy glass rooflights.

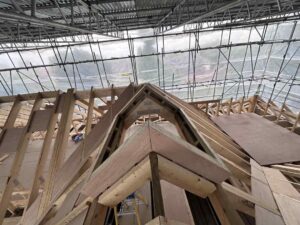
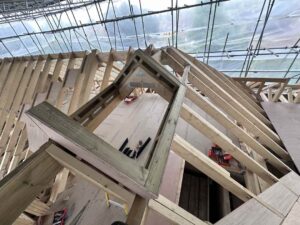
Step 3: Build the Timber Kerb
- Use 4×2 or 6×2 structural timber for durability.
- Cut mitres to match the roof pitch (e.g. 35° per side for a 35° pitch).
- Secure the kerb to the rafters and ridge with structural screws or brackets, ensuring stability.
- Key Tip: Check that the top of the upstand is level across all sides on both pitches to prevent twisting, which can compromise the rooflight’s seal Lill.
Important:
Make sure the top of the upstand is level across all three sides on each pitch. Any twist or dip will affect how the rooflight sits and seals.
Step 4: Create a Smooth Finish
- Fix 9–12mm plywood to the top of the kerb for a smooth, continuous surface.
- This ensures an airtight seal and simplifies rooflight installation.
- Avoid placing membrane or flashing over the top of the kerb—the rooflight must sit directly on the timber or plywood.
Step 5: Weatherproof the Upstand
- Apply breathable membrane to the sides of the kerb.
- Use lead flashing or a proprietary flashing kit to seal the kerb where it meets tiles or slates, covering only the sides, not the top.
Expert Tips from Overhead Glazing
- Dry-Fit First: Test-fit the rooflight before applying flashing to catch any misalignment early.
- Seal Effectively: Use expanding foam tape or EPDM air seals between the rooflight frame and kerb for a tight seal.
- Protect the Timber: Apply a preservative to exposed upstand tops during construction to prevent weathering before installation.
- Check Alignment: Ensure no twists or dips in the upstand to guarantee a perfect seal with the rooflight.
Common Mistakes to Avoid
- Ignoring Ridge Tile Clearance: Failing to elevate the upstand 60mm above tiles can cause gaps or frame damage.
- Poor Structural Support: Always verify load capacity with an engineer to prevent structural failure.
- Overlapping Flashing: Never run flashing over the top of the kerb, as it disrupts the rooflight’s seal.
Why Choose Overhead Glazing for Your Ridge Rooflight?
A well-built upstand is the foundation of a high-performing ridge rooflights. At Overhead Glazing, we specialise in bespoke ridge rooflights, with a decorative blacked edge, thermally broken frame, and Ug values as low as 1.0 W/m²K.
Our UK-made rooflights offer:
- Superior Durability: Structurally bonded glass and robust frames outshine frameless alternatives.
- Energy Efficiency: Thermally broken designs reduce heat loss and energy bills.
- Custom Options: Tailored solutions, including decorative blacked edges at any width.